
This article documents how to setup an OpenVPN server on a FreeNAS Jail, allowing user(s) to be able to access the Freenas UI via the VPN but also other areas of the network where the Freenas server resides. The user will need to specify a username, password to be able to login. The password can be set by the user, however they will also need Google Authenticator to provide a 6 digit code.
Pre-Requisites
Already got a working FreeNAS v11.3 server working with Storage Pools configured.
Network
- External IP address, this can be found by going to a browser and typing a search whats my ip address. This is the public IP address that your network can be reached on for this article assume 120.121.122.123.
- Internal Network addresses – these are the private internal addresses that your home network uses, these can be 192.168.0.0, 192.168.8.0. In this article they are 192.168.7.0
- VPN network addresses, these are addresses that the VPN uses on the client and server so it can route traffic in both directions through the VPN. With these addresses they must be different from Internal Network Addresses. Also be careful if you are on a Wifi network that they are using a Network Address different from these VPN network addresses. In this article the network is 192.168.20.0
Versions:
- FreeNAS 11.3
- easyrsa v3
Create A Jail
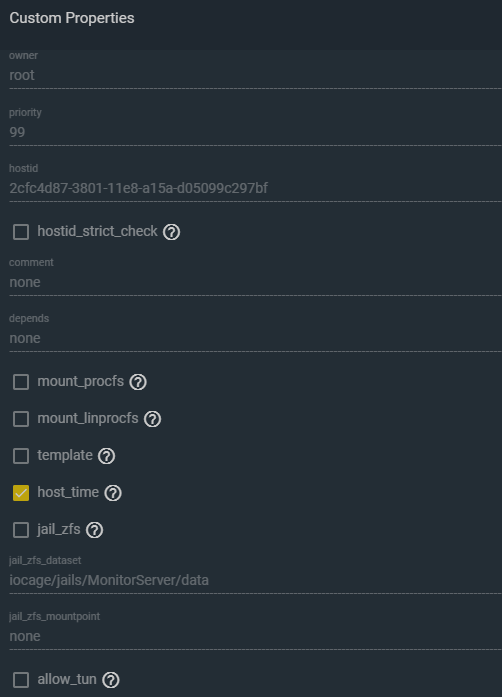
Using WebUI generated a Jail called “openvpn-jail”, when configuring make sure that the allow-tun parameter is checked under the Jail’s Custom Properties before starting the jail see below:
Installing The Required Packages
Shell into the jail and make sure your packages are up to date
pkg update
pkg -y upgrade
Install openvpn and google-pam-authenticator
pkg install -y openvpn pam_google_authenticator
This will install the openvpn package including easy-rsa tool to allow easy certificate setup.
Next we need to setup a Certificate Authority (CA) used to sign server and client certificates used in an OpenVPN setup, but first we need to configure the easyrsa tool. Lot of articles refer to previous versions of EasyRSA v2, in FreeNAS 11.3 its packaged version is EasyRSA 3. This can be check by typing:
easyrsa -h
If states Easy-RSA usage and overview the following instruction will apply.
With FreeNAS 11.3 need to consider where the various directories are located. The first file to be configured is a vars file a variables file that the easyrsa utility uses. Located in /usr/local/share/easy-rsa see below:
cd /usr/local/share/easy-rsa
It might be prudent to take a copy of the original vars file so you have the original before editing a new one. This can be done:
cp /usr/local/share/easy-rsa/vars /usr/local/share/easy-rsa/vars.distro
You will need to edit the /usr/local/share/easy-rsa/vars file as follows using an editor:
set_var EASYRSA "${0%/*}"
set_var EASYRSA_REQ_COUNTRY     "UK"
set_var EASYRSA_REQ_PROVINCE    "LONDON"
set_var EASYRSA_REQ_CITY        "LONDON"
set_var EASYRSA_REQ_ORG         "Shines"
set_var EASYRSA_REQ_EMAIL       "your@emailaddress.com"
set_var EASYRSA_REQ_OU          "IT"
set_var EASYRSA_KEY_SIZE        4096
set_var EASYRSA_ALGO            rsa
set_var EASYRSA_CA_EXPIRE       3650
set_var EASYRSA_CERT_EXPIRE     2920
set_var EASYRSA_CERT_RENEW      90
set_var EASYRSA_CRL_DAYS        180
set_var EASYRSA_DIGEST          "sha256"
Save and exit.
Note:
- Please amend values as required.
- Above features increased security for
EASYRSA_KEY_SIZEnormal value would be 2048 - Above also has a CA_EXPIRE set for 10 years and the CERT_EXPIRE set for ~8 years
- Also changed the EASYRSA_CERT_RENEW & EASYRSA_CRL_DAYS
Set the permissions on this file to executable as follows:
chmod a+x ./vars
Building The OpenVPN Keys
Generating A Certificate Authority (CA)
Next the easyrsa has to build its pki, to allow the CA to be created
easyrsa init-pki
easyrsa build-ca
It will prompt for a password for the CA Key file, after one has been entered it will generate a ‘ca.crt’ and ‘ca.key’ file under the /usr/local/share/easy-rsa/pki directory.
[root@openvpn-jail]#
[root@openvpn-jail]# cd /usr/local/share/easy-rsa
[root@openvpn-jail]# easyrsa init-pki

Note: using Easy-RSA conf from /usr/local/share/easy-rsa/vars

init-pki complete; you may now create CA or requests.
Your newly created PKI dir is: /usr/local/share/easy-rsa/pki

[root@openvpn-jail]# easyrsa build-ca

Note: using Easy-RSA configureation from /usr/local/share/easy-rsa/vars

Using SSL: openssl OpenSSL 1.0.2s-freebsd  28 May 2019

Enter New CA Key Passphrase:
Re-Enter New CA Key Passphrase:
Generating RSA private key, 4096 bit long modulus
.................................................++
.............................................................
.............................................................
.................++++
e is 65537 (0x10001)
You are about to be asked to enter information that will be incorporated
into your certificate request.
What you are about to enter is what is called a Distinguished Name or a DN.
There are quite a few fields but you can leave some blank
For some fields there will be a default value,
If you enter '.', the field will be left blank.
-----
Common Name (eg: your user, host, or server name) [Easy-RSA CA]:OpenVPN-CA

CA creation complete and you may now import and sign cert requests.
Your new CA certificate file for publishing is at:
/usr/local/shaer/easy-rsa/pki/ca.crt
Generating a Server Key
Next a server key needs to be generated, this key will be match the jail hostname so openvpn-jail. To do this use the command below:
easyrsa gen-req openvpn-jail nopass
root@openvpn-jail:/usr/local/share/easy-rsa #
root@openvpn-jail:/usr/local/share/easy-rsa # easyrsa gen-req openvpn-jail nopass

Note: using Easy-RSA configuration from: /usr/local/share/easy-rsa/vars

Using SSL: openssl OpenSSL 1.0.2s-freebsd 28 May 2019
Generating a RSA private key
........................................................................................................................................++++
............................................................++++
writing new private key to
'/usr/local/share/easy-rsa/pki/private/openvpn-jail.key.vEzncs3CXX'
-----
You are about to be asked to enter information that will be incorporated
into your certificate request.
What you are about to enter is what is called a Distinguished Name or a DN.
There are quite a few fields but you can leave some blank
For some fields there will be a default value,
If you enter '.', the field will be left blank.
-----
Common Name (eg: your user, host, or server name) [openvpn-jail]:

Keypair and certificate request completed. Your files are:
req: /usr/local/share/easy-rsa/pki/reqs/openvpn-jail.req
key: /usr/local/share/easy-rsa/pki/private/openvpn-jail.key
Signing The Server Key With The CA
Next step signs the ‘openvpn-jail’ using the CA certificate. Type:
easyrsa sign-req server openvpn-jail
root@openvpn-jail:/usr/local/share/easy-rsa # easyrsa sign-req server openvpn-jail

Note: using Easy-RSA configuration from: /usr/local/share/easy-rsa/vars

Using SSL: openssl OpenSSL 1.0.2s-freebsd 28 May 2019

You are about to sign the following certificate.
Please check over the details shown below for accuracy. Note that this request
has not been cryptographically verified. Please be sure it came from a trusted
source or that you have verified the request checksum with the sender.

Request subject, to be signed as a server certificate for 2920 days:

subject=
 commonName = openvpn-jail

Type the word 'yes' to continue, or any other input to abort.
Confirm request details: yes
Using configuration from /usr/local/share/easy-rsa/pki/safessl-easyrsa.cnf
Enter pass phrase for /usr/local/share/easy-rsa/pki/private/ca.key:
Check that the request matches the signature
Signature ok
The Subject's Distinguished Name is as follows
commonName :ASN.1 12:'openvpn-jail'
Certificate is to be certified until Mar 19 15:27:50 2028 GMT (2920 days)

Write out database with 1 new entries
Data Base Updated
Certificate created at: /usr/local/share/easy-rsa/pki/issued/openvpn-jail.crt
Verify Server Key Has Been Signed By The CA
To check that the server key has indeed been signed by the CA type the following:
openssl verify -CAfile /usr/local/share/easy-rsa/pki/ca.crt /usr/local/share/easy-rsa/pki/issued/openvpn-jail.crt
This should result in the following:
root@openvpn-jail:/usr/local/share/easy-rsa # openssl verify -CAfile /usr/local/share/easy-rsa/pki/ca.crt /usr/local/share/easy-rsa/pki/issued/openvpn-jail.crt
usr/local/share/easy-rsa/pki/issued/openvpn-jail.crt: OK
Generating/Build & Signing A Client Key
Client keys are required for the client VPN. In this example we generate a client key ‘client01’. This can be achieved by entering the command below:
easyrsa gen-req client01 nopass
root@openvpn-jail:/usr/local/share/easy-rsa # easyrsa gen-req client01 nopass

Note: using Easy-RSA configuration from: /usr/local/share/easy-rsa/vars

Using SSL: openssl OpenSSL 1.0.2s-freebsd 28 May 2019
Generating a RSA private key
.............++++
............................................................................................++++
writing new private key to '/usr/local/share/easy-rsa/pki/private/client01.key.8Cc5clJnWV'
-----
You are about to be asked to enter information that will be incorporated
into your certificate request.
What you are about to enter is what is called a Distinguished Name or a DN.
There are quite a few fields but you can leave some blank
For some fields there will be a default value,
If you enter '.', the field will be left blank.
-----
Common Name (eg: your user, host, or server name) [client01]:

Keypair and certificate request completed. Your files are:
req: /usr/local/share/easy-rsa/pki/reqs/client01.req
key: /usr/local/share/easy-rsa/pki/private/client01.key
Signing the ‘client01’ key with the CA Certificate see below:
easyrsa sign-req client client01
It will ask to type ‘yes’ to confirm the client request, it will also request the CA password.
root@openvpn-jail:/usr/local/share/easy-rsa # easyrsa sign-req client client01

Note: using Easy-RSA configuration from: /usr/local/share/easy-rsa/vars

Using SSL: openssl OpenSSL 1.0.2s-freebsd 28 May 2019


You are about to sign the following certificate.
Please check over the details shown below for accuracy. Note that this request
has not been cryptographically verified. Please be sure it came from a trusted
source or that you have verified the request checksum with the sender.

Request subject, to be signed as a client certificate for 2920 days:

subject=
 commonName = client01


Type the word 'yes' to continue, or any other input to abort.
 Confirm request details: yes
Using configuration from /usr/local/share/easy-rsa/pki/safessl-easyrsa.cnf
Enter pass phrase for /usr/local/share/easy-rsa/pki/private/ca.key:
Check that the request matches the signature
Signature ok
The Subject's Distinguished Name is as follows
commonName :ASN.1 12:'client01'
Certificate is to be certified until Mar 19 17:10:26 2028 GMT (2920 days)

Write out database with 1 new entries
Data Base Updated

Certificate created at: /usr/local/share/easy-rsa/pki/issued/client01.crt

root@openvpn-jail:/usr/local/share/easy-rsa #
Building A Diffie-Hellman Key
The Diffie-Hellman key is needed for improved security, this will be build to as a ‘4096’ DH key which was set in the vars file.
To build a Diffie-Hellman key enter the command below:
easyrsa gen-dh
This took a really long time, I ended up generating this file on a more powerful machine and the scp it down to the jail.
Configuring The OpenVPN Server
The various keys and certificates will need to be copied into the appropriate places for OpenVPN to be able to use them.
Copying The Certs Into The OpenVPN Directories
mkdir -p /usr/local/etc/openvpn/{certs,client-config,keys}
cp /usr/local/share/easy-rsa/pki/ca.crt /usr/local/etc/openvpn/certs
cp /usr/local/share/easy-rsa/pki/issued/openvpn-jail.crt /usr/local/etc/openvpn/certs
cp /usr/local/share/easy-rsa/pki/private/openvpn-jail.key /usr/local/etc/openvpn/keys
cp /usr/local/share/easy-rsa/pki/dh.pem /usr/local/etc/openvpn/certs
Need to generate a TA Key
This can be done by entering the following:
openvpn --genkey --secret /usr/local/etc/openvpn/keys/ta.key
root@openvpn-jail:/usr/local/share/easy-rsa # openvpn --genkey --secret /usr/local/etc/openvpn/keys/ta.key
Generating this protects the OpenVPN from man in the middle attacks and is recommended as a standard in OpenVPN TLS configs.
Creating a OpenVPN Server Config File
An openvpn server configuration file needs to be created as follows:
cat << EOF > /usr/local/etc/openvpn/openvpn.conf
# Server Configuration File
port 1194
proto tcp4
dev tun0
mode server
tls-server
ca /usr/local/etc/openvpn/certs/ca.crt
cert /usr/local/etc/openvpn/certs/openvpn-jail.crt
key /usr/local/etc/openvpn/keys/openvpn-jail.key
dh /usr/local/etc/openvpn/certs/dh.pem
server 192.168.20.0 255.255.255.0
ifconfig-pool-persist ipp.txt
push "route 192.168.7.0 255.255.255.0"
keepalive 10 120
tls-auth /usr/local/etc/openvpn/keys/ta.key 0 # Secret file
key-direction 0
remote-cert-tls client
cipher AES-256-CBC
user nobody
group nobody
persist-key
persist-tun
status openvpn-status.log
verb 3
explicit-exit-notify 1
plugin /usr/local/lib/openvpn/plugins/openvpn-plugin-auth-pam.so openvpn
EOF
Creating The Client Configuration File
A client configuration file is required to connect to the VPN FreeNAS Jail server and can be generated by the following:
cat << EOF > /usr/local/etc/openvpn/client-configs/<userid>.cfg
# Client Config For <userid>
client
dev tun
proto tcp4
remote <public-vpn-address> 1194
resolv-retry infinite
nobind
persist-key
persist-tun
key-direction 1
tls-client
remote-cert-tls server
cipher AES-256-CBC
dhcp-option DNS <dns-server>
dhcp-option DOMAIN <search-domain>
redirect-gateway def1 # used to route all client traffic through VPN
auth-user-pass
verb 3
<ca>
# PASTE contents from /usr/local/etc/openvpn/certs/ca.crt
</ca>
<cert>
# PASTE contents from /usr/local/share/easy-rsa/pki/issued/client01.crt
</cert>
<key>
# PASTE contents from client key /usr/local/share/easy-rsa/pki/private/client01.key
</key>
<tls-auth>
# PASTE contents of /usr/local/etc/openvpn/keys/ta.key here
</tls-auth>
EOF
Note:
- key-direction is set to 1 as it needs to be different from the key-direction specified in the server configuration.
- redirect-gateway def1 is optional if it is left in this config all traffic on the client will be routed through the VPN.
- <userid> is a userid that will be created later in this article to be used by the client to login to the VPN server
- <public-vpn-server> this is the ip address exposed to the internet, usually provided by your ISP.
- <dns-server> the IP address of your local DNS server usually provided by your router
- <search-domain> is any domain name you have given your local network, some ISP supplied routers is can be local or home
Create A gauth userid
A gauth userid is required for the google-authenticator library, this userid cannot login to the system, but will be used to create authentication tokens for the PAM module to impersonate when checking the login details. To create this id type
root@openvpn_jail:/ # pw useradd gauth -w no -s /sbin/nologin -d /usr/local/etc/openvpn/google-authenticator
A gauth config directory needs to be created for the google-authenticator module and the appropriate owner and group set for this directory. To do this type:
root@openvpn_jail: / # mkdir -p /usr/local/etc/openvpn/google-authenticator
root@openvpn_jail: / # chown gauth:gauth /usr/local/etc/openvpn/google-authenticator
Create PAM Config
root@openvpn_jail: / # cat << EOF > /etc/pam.d/openvpn
auth required /usr/local/lib/pam_google_authenticator.so secret=/usr/local/etc/openvpn/google-authenticator/${USER} user=gauth forward_pass
EOF
This PAM config specifies the module to use when OpenVPN uses PAM to authenticate the user.
Note:
- During the PAM authenication process the ${USER} is change to the userid logging on and uses the /usr/local/etc/openvpn/google-authenticator directory to store the client secret.
- user=gauth makes the PAM module impersonate gauth (created above) userid to check the supplied credentials
Create VPN user <userid>
The VPN user is an id used by the client to VPN onto the OpenVPN server. To create this with a random password:
root@openvpn_jail: / # pw useradd <userid> -s /sbin/nologin -w random -d /
Note:
- Omit the -w random if a supplied password is required.
- replace <userid> with the userid of choice, ensuring it matched the userid specified when creating the client configuration file above.
Create GoogleAuth Token for user
The next step will create a unique secret token for the supplied userid. This token presents itself as a QR Code within the console, also as a long alphanueric. Use the Google Authenticator App to scan the QR Code.
root@openvpn_jail: / # su -m gauth -c "google-authenticator -t -d -r 3 -R 30 -f -s /usr/local/etc/openvpn/google-authenticator/<userid> -l'OpenVPN Login'"
Note:
- Replace
<userid>with the appropriate id. - There were problem when initially typing this command, ensure that the /usr/local/etc/openvpn/google-authenticate has r-x for your root id to be able to write.
- Another problem was the specification of quotes around the command was problematic with the shell
Amend Firewall Rules On FreeNAS Jail to NAT All 192.168.20.0 Traffic
The following command line creates a script which sets up the firewall rules so that traffic on 192.168.20.0 will route through the Jails network interfaces and out onto the local network. It also configures the tun interface so which is used as a virtual pip to route traffic.
root@openvpn_jail: / # cat << EOF > /usr/local/etc/ipfw.rules
#!/bin/sh
EPAIR=\$(/sbin/ifconfig -l | cut -d' ' -f2)
ipfw -q -f flush
ipfw -q nat 1 config if \${EPAIR}
ipfw -q add nat 1 all from 192.168.20.0/24 to any out via \${EPAIR}
ipfw -q add nat 1 all from any to any in via \${EPAIR}
TUN=\$(/sbin/ifconfig -l | cut -d' ' -f3)
ifconfig \${TUN} destroy
ifconfig tun create
TUN=\$(/sbin/ifconfig -l | cut -d' ' -f3)
sed -i '' -e "s/^dev tun.*/dev \${TUN}/" /usr/local/etc/openvpn/openvpn.conf
EOF
Note:
- Replace if required your VPN network in the case above it is
192.168.20.0and ensure it is in CIDR notation. - If you do use the cat << EOF notation to create the /user/local/etc/ipfw.rules file make sure you escape the $ by inserting a backspace (\$) otherwise you will get a “Variable name must contain alphanumeric characters.” message. Using a less /usr/local/etc/ipfw.rules will then show the file without the $ escaped.
Allow Jail To IP Forward
To allow the Jail to move traffic out, enable IP forwarding by typing:
sysctl net.inet.ip.forwarding=1
Add Initialisation Variables For OpenVPN
On starting this jail certain variables need to be added to /etc/rc.conf. The suggestion here is that perhaps not to start the OpenVPN server until all the configuration checks out. Place the following at the start of the /etc/rc.conf file
cloned_interfaces="tun"
The next set of lines to add if the following:
gateway_enable="YES"
firewall_enable="YES"
firewall_script=/usr/local/etc/ipfw.rules
Restarting The Jail to see whether these setting have worked.
Manually starting the OpenVPN Server For Testing
Testing that the OpenVPN server starts correctly help determine any configuration problems. To do this, type
root@openvpn_jail: / # openvpn /usr/local/etc/openvpn/openvpn.conf
This will manually start the server, changing the ‘verb’ value in the openvpn.conf file will help with more detailed messages.
When finally happy and confident of these settings and your have finished testing the client configuration and successfully tested adding the following lines into the /etc/rc.conf will run the OpenVPN server on startup of the jail.
openvpn_enable="YES"
openvpn_if="tun"
openvpn_configfile="/usr/local/etc/openvpn/openvpn.conf"
openvpn_dir="/usr/local/etc/openvpn/"
Directing the OpenVPN Logs To /var/log/openvpn.log
Ensure the following line is placed at the bottom of the /etc/syslog.conf
!openvpn
*.* /var/log/openvpn.log
Housekeeping The OpenVPN Logfiles
So the logs don’t get too large and unwieldy use the syslog rotator to manage logs sizes by typing in the following:
root@openvpn_jail: / # mkdir -p /usr/local/etc/newsyslog.conf.d
root@openvpn_jail: / # cat << EOF > /usr/local/etc/newsyslog.conf.d/openvpn
/var/log/openvpn.log      600 30 * @T00 ZC
EOF
Configuring The Client
Copy the /usr/local/etc/openvpn/client-config/client01.cfg of the server and onto a client running OpenVPN. If using SSH for your jail should be fairly easy to do.
Using this client01.cfg you may wish to rename it to a .opvn file.
When running the VPN set to prompt for a username which is the <userid>, password is the mfa token (6 digit number from google authenticator)
<mfa token (6 digit number)>
Tools Used For Testing/Problem Solving
Ensure your firewall/router is Port Forwarding traffic over 1194 to your internal FreeNAS OpenVPN Jail.
On the OpenVPN jail running:
tail -f /var/log/openvpn.log
will provide a realtime event log of things happening in the openvpn session. Try altering the verb value in /usr/local/etc/openvpn/openvpn.conf file up to 6 to get more detailed information.
Tunnel problems change x to the tunnel number various commands shown below
root@openvpn_jail: / # ifconfig
root@openvpn_jail: / # ifconfig tun create
root@openvpn_jail: / # ifconfig tun<x> destroy
References with thanks:
- https://medium.com/@pixeldrew/openvpn-on-freenas-11-3-with-mfa-using-google-authenticator-cf79ec828a25
- https://www.howtoforge.com/securing-openvpn-with-a-one-time-password-otp-on-ubuntu
- https://superuser.com/questions/706967/how-to-get-openvpn-server-to-forward-tun0-packets-to-the-local-network
- https://openvpn.net/vpn-server-resources/troubleshooting-reaching-systems-over-the-vpn-tunnel/
Great tutorial!
Worked beautifully and really helped me out 🙂
Couple small corrections/ additions for the next guy using it:
jail needs to have custom parameter “allow-tun” enabled
changed to “sysctl net.inet.ip.forwarding=1”
changed to “pw useradd gauth -w no -s /sbin/nologin -d /usr/local/etc/openvpn/google-authenticator”
openvpn.conf
changed to “cert /usr/local/etc/openvpn/certs/openvpn-server.crt”
changed to “key /usr/local/etc/openvpn/keys/openvpn-server.key”
changed to “dh /usr/local/etc/openvpn/certs/dh.pem”
client.conf
changed to “resolv-retry infinite”
Thanks very much for taking the time to provide those corrections, I have now included them in the main article.
Hi,
I was able to set up everything but the authentication fails, even though I type my password + key code correctly. Any ideas?
I just get the message SENT CONTROL [(my userid)]: ‘AUTH_FAILED’ (status=1)
If the password example is ‘abc’ for the user and the authenticator code example is ‘123456’ than the password should be :’abc123456′? Correct?
Just had time to look at this again, there is an error there in the blog apologies. You just need to put in the Authenticator code only, and no user password and it should work, I have updated the article to reflect your findings. Thanks for taking the time to point it out.
Good morning. I am following this guide. It worked up to this one:
cp /usr/local/share/easy-rsa/pki/ca.crt /usr/local/etc/openvpn/certs
I got:
cp : /usr/local/ect/openvpn/certs: No such file or directory
Do I have to create the folders myself?
Many thanks.
R.
Thanks for taking the time to point this out. Yes the article seems to be missing the mkdir to create the various /usr/local/etc/openvpn/ directory structure, have corrected this and added a mkdir -p /usr/local/etc/openvpn/{certs,client-configs,keys}.
Hi,
thanks a lot for this tutorial ! I would like to participate with fix for some issues I have when I followed exactly the tutorial:
replace:
mkdir -p /usr/local/etc/openvpn/{certs,client-confis,keys}.
==> mkdir -p /usr/local/etc/openvpn/{certs,client-configs,keys}. (g in configs)
in server config file:
cert /usr/local/etc/openvpn/certs/openvpn-server.crt
key /usr/local/etc/openvpn/keys/openvpn-server.key
==>
cert /usr/local/etc/openvpn/certs/openvpn-jail.crt
key /usr/local/etc/openvpn/keys/openvpn-jail.key
(replace -server with -jail)
Also I had to replace full path:
tls-auth keys/ta.key 0 # Secret file ==>
tls-auth /usr/local/etc/openvpn/keys/ta.key 0 # Secret file
also tcp4 was rejected on my server, so I used “ucp” instead (server conf file and client conf file modified)
again thanks a lot for this tutorial, it helps me a lot!
Thank very much for taking the time to point out these corrections, I have added them all in apart from the tcp4 to ucp for the time being as tcp4 works on my setup. Will leave it to the community to decide, I know the purist will say that it probably should be ucp. Pleased you found the article useful.
Hello, thank you for the guide. I am having a bit of trouble with one step, though. When trying to amend the firewall rules, I enter “EPAIR=$(/sbin/ifconfig -l | cut -d’ ‘ -f2)” and I come back with an error that says “Variable name must contain alphanumeric characters.”
When I try to input “EPAIR=$(/sbin/ifconfig -l | cut -d’ ‘ -f2)” the shell responds with “Variable name must contain alphanumeric characters.” on the Amend Firewall Rules On FreeNAS Jail to NAT All 192.168.20.0 Traffic step of the quide. Am I doing something wrong? How do I fix this issue? The process has been smooth thus far…
It appears that if you are using the cat << EOF > /usr/local/etc/ipfw.rules to create this file, all $ must be escaped otherwise you will get the “Variable name must contain alphanumeric characters”. I have corrected the post, and added an additional note to point this behaviour out. Thanks for taking the time to report and apologies for not getting back to you sooner.
Noticed ahendrickson1990 had the same problem, it appears that if you are using the cat << EOF > /usr/local/etc/ipfw.rules to create this file, all $ must be escaped otherwise you will get the “Variable name must contain alphanumeric characters”. I have corrected the post, and added an additional note to point this behaviour out. Thanks for taking the time to report.
Hi There,
I’m having problems with “Create GoogleAuth Token for user”. The quotes give the following message- Unmatched ‘ ” ‘
I tried a diferent arrangemnt that looks like this – su -m gauth -c “google-authenticator -t -d -r3 -R30 -f -l \”OpenVPN Login\” -s /usr/local/etc/openvpn/google-authenticator/” but it gives “Unknown option `-r3’ “.
What should I do get over this?
Thank for letting us know, try putting a space between -r & 3 e.g. -r 3 and the same for -R 30. These refer to rate limiting and the rate time see google-authenticator man page.
Or you could specify the full flag instead –rate-limit=3 and –rate-time=30, have amended the article to correct this.